Showing posts with label Cheshire. Show all posts

Wednesday, 12 June 2013

I had one sunny day, so I took advantage if it.

Last week there was a break in the endless rain that has been June, so I took advantage of the dryness to paint the Sai's.


I found some old sticks in the burn pile and used them as my holding devices.


Coat number 1. Number 2 followed, after #1 dried.

Now that the paint is dry, I am waiting for glue to dry....

And here is the finished product.
Or so I thought, the paint chipped in a couple places! Now I have to wait for another dry day to paint again
:(

Thursday, 6 June 2013

How to make a holster/scabbard/sheath for Sai's

 First, find a pair of Sai's.  My friend found these (convention legal) toy sai's from the 80's on Ebay for me.  Which was fun, they came from Greece and if the seller knew I cut these "vintage" kids toys, he might die, BUT the handles were made for cute little kiddie hands, not a 32 year old woman hands.

Yes, they will be painted silver eventually and the dowel my dad cut down in his work shop with be hidden by  wrapping around the handle.

Anyway, to the point:

 Lay your sai down on some brown paper and measure how wide from edge to edge the cross bar is.  Mine was 7cm. Then mark the bottom of the sai on the paper.  Draw a straight line from the crossbar to the bottom and draw in the shape.  I did that on one side, folded it over in the center and cut it out to make sure everything was even.

After doing that,  do the same for the front only make it 2cm shorter.  Cheshire's Sai holders have an open rectangle down the middle so I added that in.

Cheshire's Holder also had a line across the top of the U shaped piece there, so I cut the top off and will later sew them together to make it whole again.  Also, if you are putting this on over a belt (like me) don't forget to mark in the back where you will cut slits in to slide it over the belt.
 I ended up cutting 2 back pieces, one for where the slit is to go over the belt and one to make the back black through that little rectangular hole in the front.  If you don't have the peep hole, you don't have to do that. I ended up doing it because the other side of the vinyl I used had a gray mesh and I didn't want that to show.

Here it is all sewn together.


The next step was to attach the band that holds the Sai in the holder. For which I used Black snaps.  All you need is the little tool, a pack of snaps and a hammer!  Cut 2 little strips and mark where your snaps will be, punch out the holes, hammer in the snaps (according to the instructions on the pack) and voila!


Sai holders for your Sai's!

Green top

Is done!  
Not that you would know from these pictures :P
So here it is all cut out with the rather...creative sleeves. 
The tattered sleeve was made by drafting a normal sleeve, then cutting it off about 1 inch or so below the underarm line. I then drew in the ripped look.  I cut out 2 pieces for it and then steam a seamed them together. I learned from the red dress to not do the steam a seam in the seam allowances, it just made for a frustrating sew. I did have to adjust the tattered sleeve once it was in, I wanted it to flip up a bit like the characters did and my pointed down like a regular sleeve.  So I actually cut the tears right up to where it attached onto the sleeve (and then shortened some of the points as they now looked really exaggerated). I plan on ironing them again around my sleeve roll ham with the iron to get the pointed up flip look they have in the cartoon.

The next step after the sleeves were in was binding the front.  Which I did by making a strip and attaching it on. I made sure the strip stayed the same width the entire way around with a hem gauge.
   The top is now completely bound and hemmed and sitting on a chair.  The next step with this costume is to make the holsters for her Sai's and the green strips that go around her lower arms.

Oh also, like I have said, I saved time by going out and buying a belt at Walmart. I did have to take it in (it was a L-XL sized one) but that seam will be hidden by the box in back that holds her collapsible katana's. Anyway, It had silver studs allll over it and a silver buckle.  And hers is all black. I was going to paint them over with my brothers old model airplane paint, but then I read the label that said it contained a chemical that was know to cause birth defects and you know CANCER! D:

Well I wasn't too worried about the birth defect thing, but the cancer part, that runs strong in my family and I didn't want to push it.  I ended up painting them with a bottle of black nail-polish :P  Much less deadly and useful for later!
 I'll update with pictures of the now hemmed coat later, once I am sure the hems are straight and not bubbling :)

Saturday, 1 June 2013

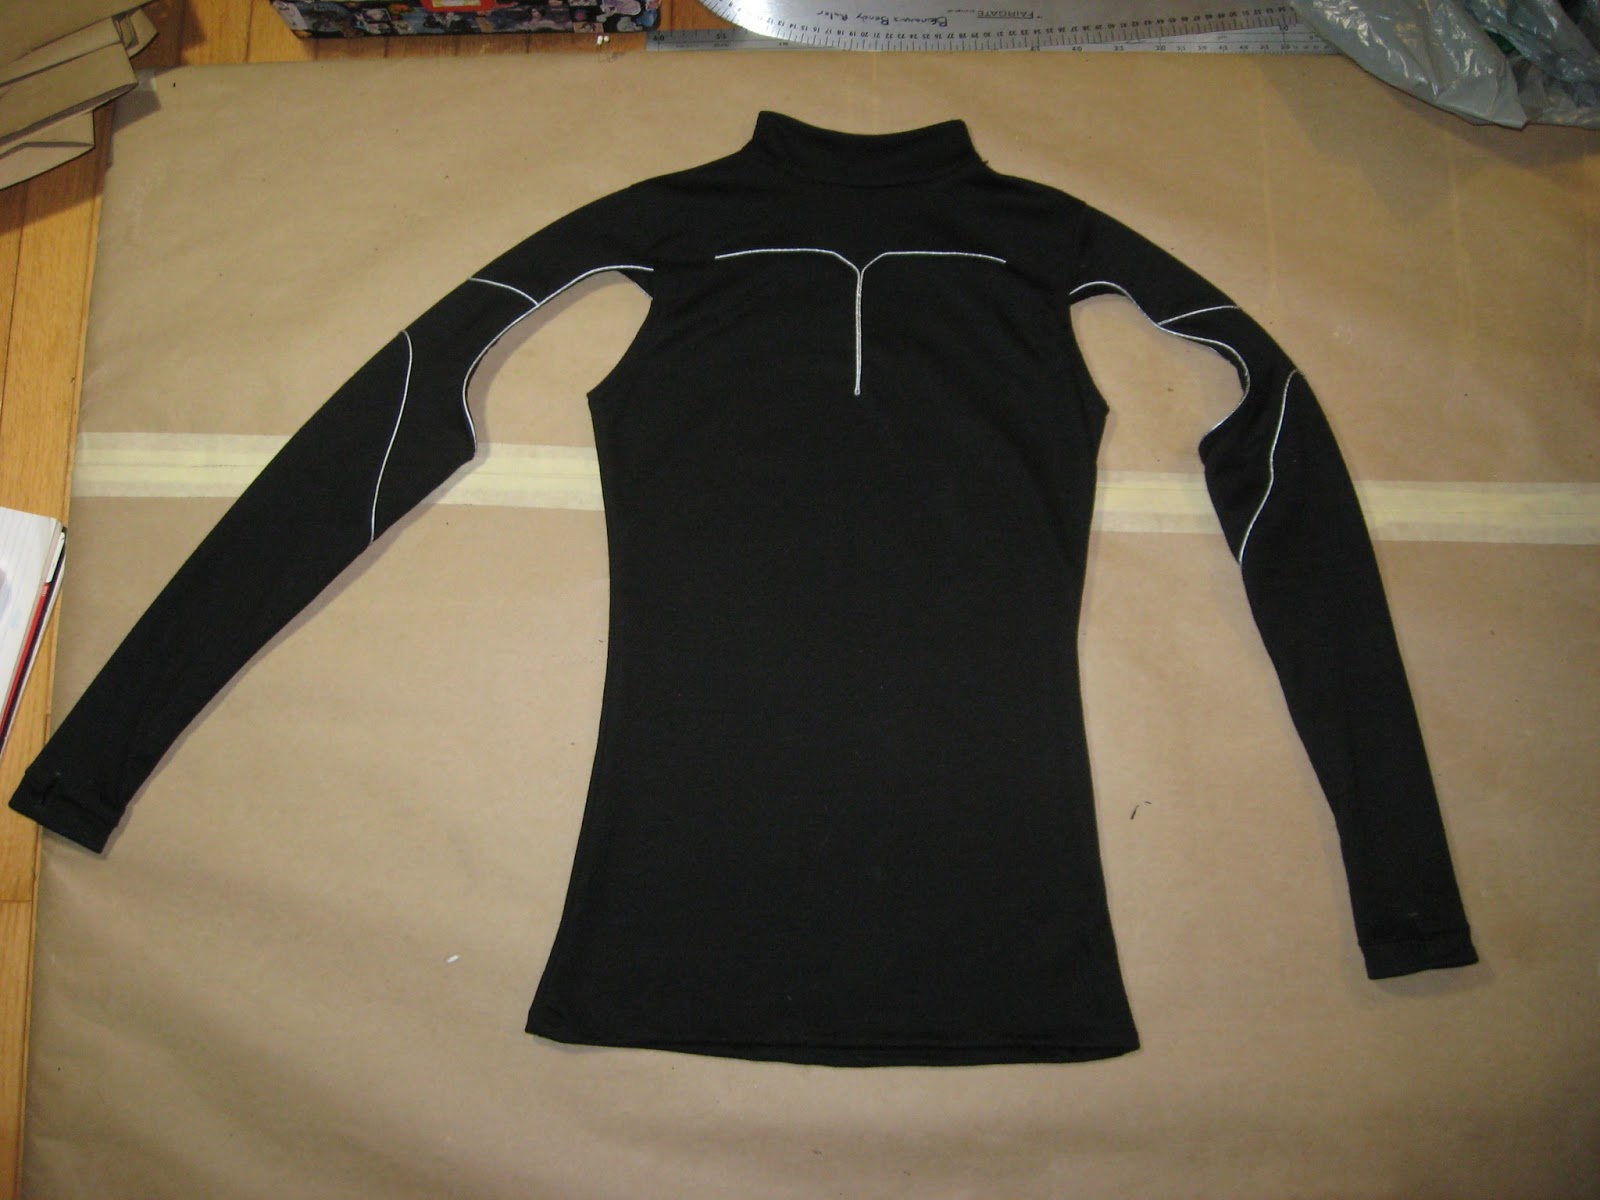
Every female Ninja needs a little black shirt?

With the exception of the green banding on the arms, (which will be done once I cut out the green top of the costume to make sure I have enough fabric) Cheshire's undershirt is done!

Yeah, that green banding.
Ouch?
Here are the basic pieces, front back, sleeve and collar. Of course there are 2 sleeves, but my board is only so big.

I did things a bit different this time.  I've been losing my marks and seam lines due to rubbing of fabric (chalk lines) or ironing (tailors wax) and seeing as she has so much detail on her arms and chest, I actually tailor tacked/basted my marks and designs before I sewed it together.  This one is for the center front of her shirt.

I'm not sure the point of these lines on the chest, my guess from an anatomy point of view, is to give the illusion of a collar bone? But whatever....
I must be getting tired, cause I swear this image just blinked. D:
Anyway, these are for the designs on the sleeves.  The three pink dots along the top are to show me where the back of the sleeve is since it looks almost exactly the same front and back. And the lines are my guide for the gray cord.


Tailor tacks are something I learned in tailoring, you just run a few basted stitches in an obvious colour where your notches are to make sure they don't rub off or iron off (depending on what thing you use to mark the pattern on the fabric). Once you are done sewing the garment, you just pick them out with a stitch ripper.

The shirt is all together and awaits the silver/gray lines.

A few hours of hand stitching later with the TV on to keep me sane, we have a shirt!

 I stitched all the cord on with invisible thread, which is a wonderful product, if a bit maddening when trying to find the thread to snip with your scissors. (Its like very, very, very fine fishing line. And in poor light, near impossible to see!)

Now I am going to sleep.  Tomorrow I make the green kimono style top!


We're all mad here. Cheshire from Young Justice progress

I'm starting to get backed up with photos! My goal for this weekend is to have this costume sewn and near completion so I can work on props and my two commissions the rest of the month. So far, so good.

The green waist obi is done.  And the knee guards are done.  And I've saved myself some time by finding a belt  at Walmart that (once I paint all the silver studs black) will work for her belt.

To make the knee guards, I took measurements above my knee, around my knee and below my knee and made a 20cm long tube.  Which I then pulled on my leg:

And pinned it in tighter, since I was using stretch it was of course looser then need be and I needed this to stay over/on my knee with nothing but think thigh-high black socks underneath.

After I carefully slid it off my leg (pins are sharp m'kay?) I adjusted the pins so they were straighter.  Then it was just a matter of zigzag (or stretch stitching) the new seam line and finishing my edges.

The black part (what is that a hole? and applique? I dunno. Some sort of knee armor I guess) I could have done 2 ways: I could have actually just cut the shape into the gray material and used the black of the sock underneath it to form the shape, but that has been done, and I didn't like how it looked.

So I cut out the black shape from some black stretch fabric and with Steam-a-seam I attached it to the gray band for my knee.  I then zigzag stitched the edges around so it wouldn't come loose or look messy.  An easy fix.

I ended up digging out my gator pattern (God, I love how useful this pattern is!)  traced and shortened it to make the gray boot covers she has.  They close on the inside seam with velcro and  I'll be wearing them over my black doc martins for the costume.  I couldn't find a gray in a non stretch fabric that matched the gray I had for the knee guards, so I took a chance and interfaced it with some very stiff iron-on interfacing (use an press cloth!!).  And it worked out great, if perhaps maybe a bit too stiff.

Pictures once the polish on my boots dries. :D


Next update: The black undershirt.


Monday, 27 May 2013

On to the next!

The patterns for Cheshire are done! Now to begin on Sailor Jupiter!


The pile o' paper...is much smaller then normal.


Plus i found a belt at Walmart, which after I paint all that silver black and attach the holsters for her Sai's and Swords will work well for her belt (and save me time!)


Tuesday, 21 May 2013

The Red dress event and wedding are over and so con season begins!

The Red dress event and wedding are over and so con season begins!  Which means I spend my week of vacation hoping for sun and getting a jump on costumes and commissions for the summer conventions!

  First up, Cheshire from Young Justice.  I already have her wig, black socks and Sai's.   I have drafted the green top, the sash and the start of the black undershirt.  The part that scares me the most is the mask.

For a client, I will be making Sailor Jupiter.  I just need a neck and waist measurement and then I can make the costume.

And  also for a client, Red Arrow from Young Justice, actually the brother of the Sailor Jupiter cosplayer.  I am waiting on measurements due to the fact that this fellow is working out to get Roy's body here and he is almost there!


Monday, 11 February 2013

The Ghost of cosplays yet to come


I am so sorry!  Life has been a little full the last couple months and I've been neglecting my blog, website and  Facebook group.  SORRY!

I've got a wedding dress and the red dress campaign to finish off first, but after that, if all goes well I'll be starting some cosplay costumes again!   I've had these since last month some time, but hadn't posted any pictures yet.  What are they you ask?  Masks, silly, silly masks that will eventually, with the help of paper clay and paint will become other characters masks.

First off, a child's Captain America mask, will become (I hope, molding is not my strong point, but a co-worker who also cosplays is a master of props and has offered to help me) The Batman Animated Batgirl's mask.


I had this idea months ago when I first saw the masks in stores around the time The Avengers first came out. I was sure it would work, and then while floating around on deviantart, I found a girl who did just that and I knew I had been thinking right!

And then if that all works out:


The white ninja dude's mask from G.I. JOE will become Cheshire from Young Justice's mask.


 It should be interesting!  I hope to at least have Batgirl done for Animartime at the end of June, but will be super excited and happy if I can have Cheshire done as well.  If not then, Halloween 2013.