Monday, 25 July 2016

Autumn Ranger.

11 movies (mostly horror and a few early Dreamworks animated) a full season of Young Justice and 15 minutes during a lunch break and the vest embroidery is done!


Now to finish the pants and shirt.

Sunday, 17 July 2016

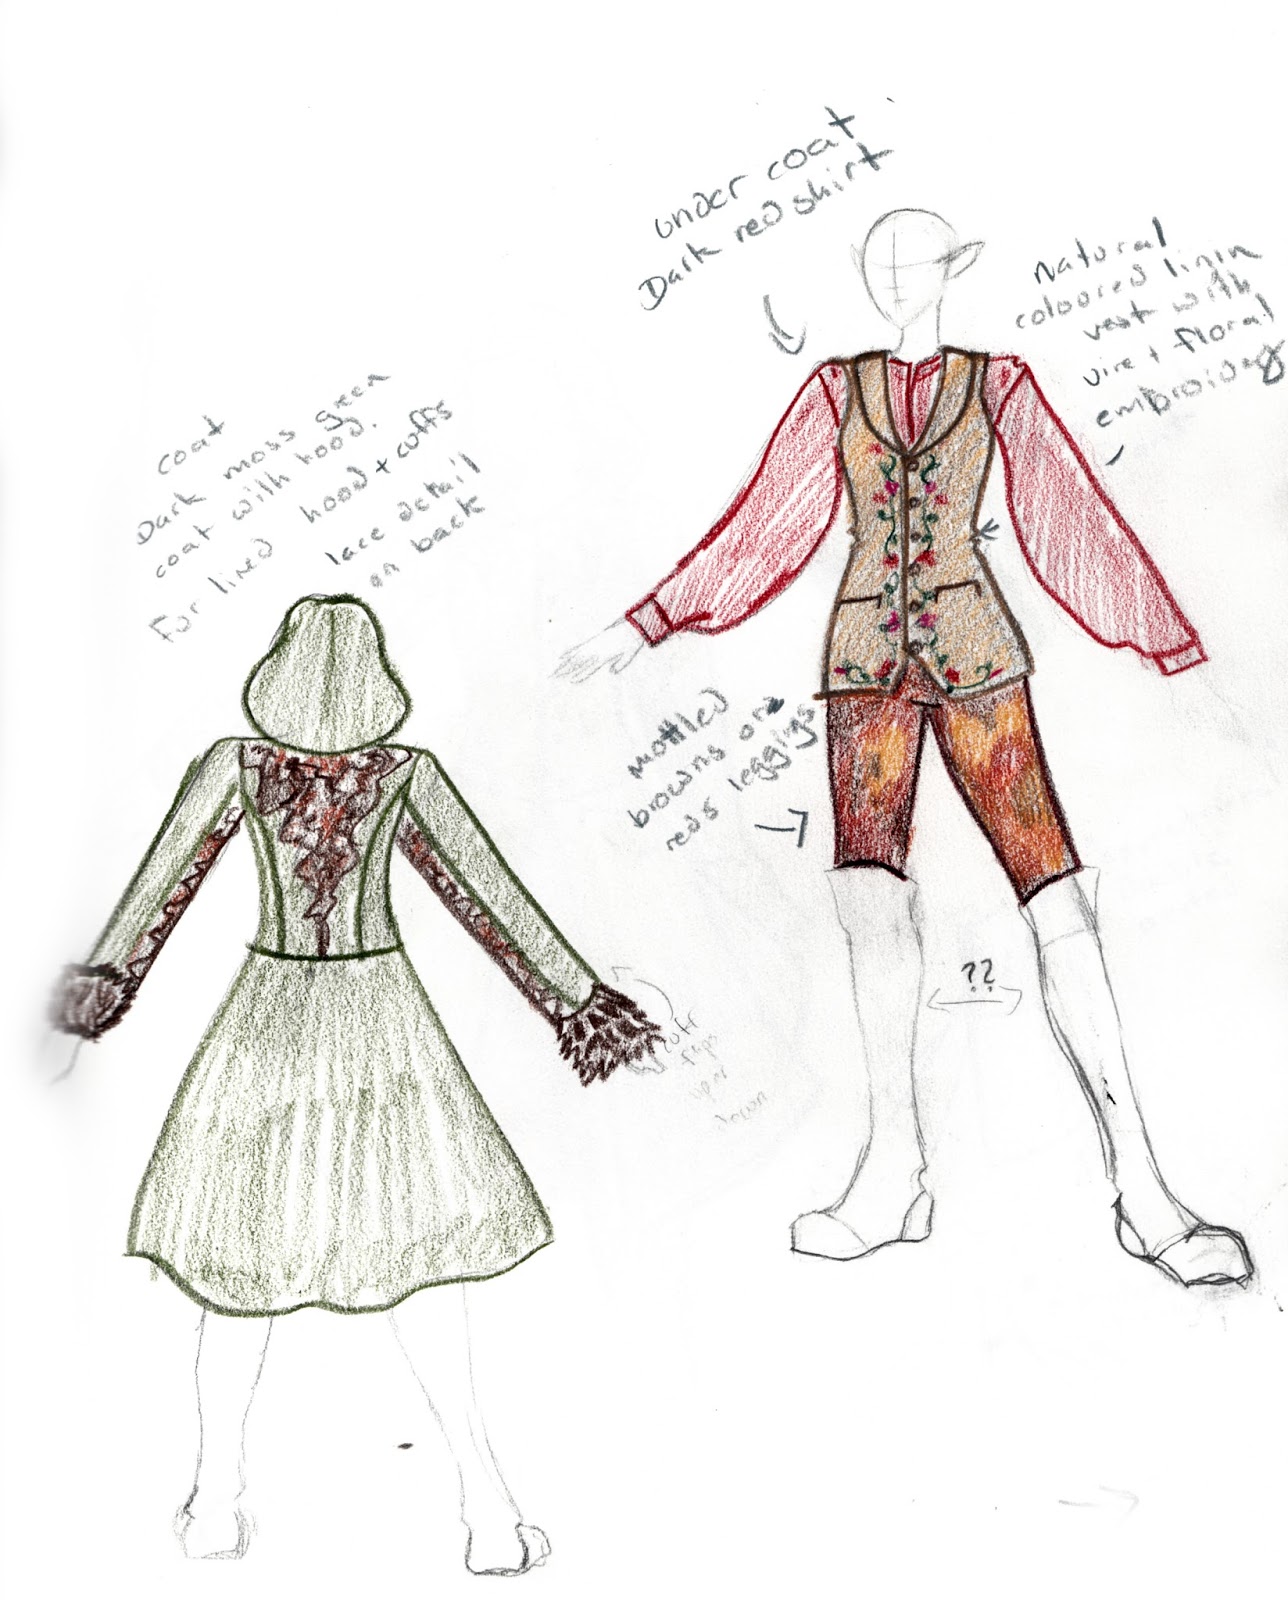
Original design: Autumn Ranger


I decided that for Halcon 2016 I would do an original design/character. It is going to be an Elven Ranger.  I could have done another anime/game cosplay, but Halcon is in November and most cartoon characters have not much in the department of winter wear.  This way, i will be warm and hopefully look cool!

The coat will be made of a moss green pinwhale corduroy with lace and fur details and lined in lace and a splatter painted orange satin.


The vest will be made from Linen suiting, the shirt from a red Indian cotton and the pants (tights really) are a mottled glitter spandex that I will be using the wrong side out (therefore no glitter).

Here is the fabric stash! I went with the brown mottled fabric down at the bottom and not the red, I thought it looked like tree bark.


I just finished one side of the embroidered design on the vest and I am about to start the next!  When it is all ready to go it will be lined with the black satin in the above picture which has foxes, rabbits and Unicorns on it.  Because. I. Can.


 This is the design I used for the border print.

Monday, 27 June 2016

All done!

Saya's dress is all done and dropped off to her rightful owner.  She will be wearing it at Animaritime 2016 this coming weekend.

I had a great time working on this dress! It gave me very few problems, though my surger did die while I was finishing it. (sadness)  Hopefully that can be fixed. I think ! blew a fuse.  At least it died when I was on the very last step.


Anyway Enjoy!  Hopefully I will have more pictures later.


Friday, 17 June 2016

What a weekend! (and Tuesday!) I went from a mock up and a half finished skirt, to a full dress waiting to be hemmed!


The fitting I had on sunday went well.  The skirt is very fun and poofy over the wedding dress crinoline my client bought.  I fit her for the mocked up top and positioned the red band near the hem line.


We decided to probably keep a lot of the length in back, while not 100% accurate to the dress in Blood plus; trains are fun. So it stays.


 Here is where she stands right now. All the trim is added and the lining is all attached. I'll be hemming it Monday after I pin my client for length.


Now with 100% more zipper.

Sunday, 12 June 2016

"The circumstance of this skirt is the size of a 2-man dome tent!" -Bronwen Robbins

I actually did say that yesterday.

Hi everyone! I neglected this poor blog again. I am sorry.

I did get all 3 Sailor Venus costumes done and I wore 2 of them at Anime North 2016.  Why only 2? Because I was sick and because Toronto that week was like walking on the surface of the sun, and unbelievably humid. Like we would have been less wet (the sweat UGH) if we had been on the bottom of the ocean.

Anyway!  I am back in nice rainy not humid New Brunswick and working on a commission for Animaritime at the end of the month.

And here she is:


That's right! Saya from Blood+.  I am excited.  My client even has a twin sister who is a singer.  We are trying to convince her to do Diva next year with her sister.

Anyhoo.  This costume is a hybrid.  The top is by ME!  and the bottom is by McCalls patterns.  Cause why waste all my precious drafting paper on the huge skirt pattern when McCalls already has patterns of what I need?


 So far I have the skirt and lining all sewn together and the choker (times 2 cause I like variety) made.  The sleeves and sash will be done by the end of tonight. Then the top later this week.


Woo~

Friday, 22 April 2016

Hello again!

Things got away on me there.  I've since finished both Sailor V and Princess Venus since the last post, and I have started on Sailor Venus!

So here is what I have been up too!

I finished the compact for Sailor V:
Outside


Inside.
The good weather arrived, and after some trial and error with paint jobs, I got the shoulder wings for Sailor V done. I tried doing an acrylic wash with silver paint, but it was streaky and I hated it. I tried my peweter spray paint, but it was WAY to dark.  So eventually I found some silver spray paint (with a  hint of glitter) and this is the result.

Indoor, with natural light
Indoor, in shadow.
 And here is the finished Princess Venus dress!

I had just enough wind that day to help show it off.


Saturday, 5 March 2016

Craft day!

Now that all the sewing is done, I am making a different kind of mess!  A crafty mess.  I've been working on the broach for Sailor V/ Sailor Venus, the shoulder wing armor for Sailor V and V's Crescent Compact.


The broach is currently gluing.  I tried just attaching the worbla to the back of it, but that just popped apart. Which makes sense, but I was not entirely awake yet when I started that, so didn't think about it at the time.  The back which has the pin attachment (not pictured) is still worbla, but is being glued to the Gemstone (paperweight) with weld-bond glue.  It seems to be working, but needs pressure to fully work right (hense the clamps).


I cut out and shaped the sleeve wing/armor things today. They are also made from worbla, cause I had some lying around still. Molding worbla onto the body is (go figure) 10times harder when it is just you doing it, so sadly I have more air bubbles then I would have liked. I am hoping I can hide those with the gesso layers though.


 The Crescent compact is coming along well! I'm pretty proud of it so far.  the top is 2 layers of Craft foam glued together, with the crescent that goes around the red gem molded in, and the bottom is 3 layers of foam. I wanted it to have a bit of depth to it and not just be 2 flat single layers of craft foam on both sides, covered in Worbla.
The compact will click closed with magnets when done, be spray painted gold and have gems on top.  The hardest part with this prop was trying to figure out how to hinge it so I could open and close it.  Logically, one would think the hinge would be on the rounded edge, but logic has forsaken this compact and the hinges as you can see are on the points of the crescent.


So, after a lot of thinking and asking for advice, suggestions included drilling a hole and attaching them with a wire loop, which would work, but would probably not stand up on its own, adding in springs, more magnets or a hinge.  I went with a hinge.  I looped some very small worbla noodles tightly over some cut off q-tips, this gave me a nice tight, rounded fit like the plastic hinges on many toys.  I allowed it to cool down till it was cold/hard again before gently turning the q-tip to get it out again. This left me with perfect little loop hinges that work great! I just need to cut down the last bit of my q-tip and add some sort of stopper (probably a bead of worbla or plastic) so the hinge dosn't come out.


The effect is pretty good so far, though I may switch out the Q-tips I have for something else, as mine appear to be compressed paper and that does not bode well in case of rain or accidental wetting.


 Now begins the boring (and messy) stage of layer upon layer of gesso, then sanding, then a couple more layers of gesso, then more sanding etc etc till I have a smooth surface to paint.