So in preparation for my upcoming Dipper Pines cosplay (my best friend is gonna be Mabel), I needed a couple of things, one the Hat, that was easy thanks to Ebay and two Journal 3.
So I began looking for books in the right size and colour (which is a maroon) and after much searching and deciding not to use a second hand bible (they are always the right colour and shade) I found a book at the local second hand book store on English Architects and Architecture that was already water stained and only $5.
What do you need?
- 1 old book
-craft or exacto knife
-pencil
-sharpie
-charcoal
-paint (gold, black and maybe copper)
-cardboard or mattboard
-craft glue
-spray bottle with water (optional)
-light sandpaper
-tracing paper
The first step I did was print off some reference pictures. The second step was draw on the torn edges lightly with pencil and then cut them out with an exacto knife. I then frayed the edges with the knife and sandpaper.
 |
| For example, here is the back. |
Then I found some book corners at Michael's and attached them with pliers and craft glue. You can do this or make your own.
 |
| Then I waited for glue to dry. |
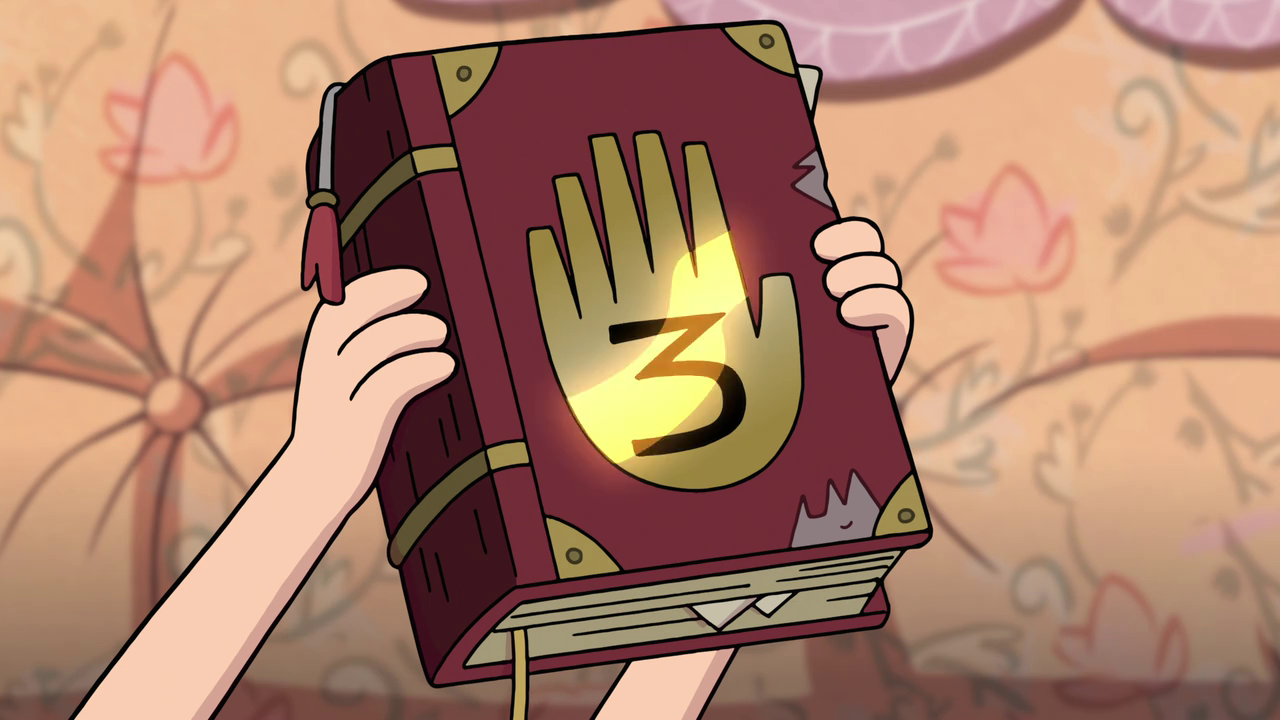
Journal 3 has been in a tree somewhere in the woods behind the MysteryShack for an unknown period of time. I do not want this book to be pretty. I want it to look like it's been inside a fake tree. Which is one of the reasons I bought a book for $5 that had water stains, but it wasnt't enough water stains, so with a squirt bottle, I added more.
The end product looks like this:
Now that I had the start of the stains and the rips on it, it was time to tackle the hand. I found another reference image of the book cover and printed it off so it would be the same size as my book. this took me a couple tries.
Then I tested to see if it would be the right size and for placement.
Once I had that I dug out my tracing paper.
And traced it. This is so I would have the right placement/shape for the 3 in the center as well as a guide for the black boarders around the edge.
Ta-da!
Next, I dug out an old scrap of Matt-board. I chose to put my hand on the black side rather then the white side because my edge clips are not a pure gold, more like a tarnished gold and I wanted the gold hand to look similar.
I traced it with a white chalk pen (found in the Clover section at Fabricville or where ever quilt supplies are sold).
Time for the paper transfer! Remember to flip the image over and re-trace on the back side of it or the graphite transfer if the image wont work. To do a paper transfer with tracing paper, simply place the image over whatever it is you are tracing and the draw over it again with a hard leaded pencil.
I was going to do the gold with paint, but then I remembered I had this baby! It stinks, but it works soooo well!
One gold hand ready to go!
Except the gold was too perfect, so I sanded it a bit with fine sand paper to make it look more worn. I also added a wash of copper and black acrylic paint to make the gold look more like the antique gold edge clips.
Sadly this did cause the gold colour to dust into my black edges and #3, but that is what black acrylic paint is for!
Since I was using matt board which is black on one side and white on the other, I also had to paint the edges of my hand black with a fine brush.
Finished product, ready for attaching (and a bit of drying, the 3 is still wet there)
The symbols on the back I had drawn in lightly with pencil after I ripped the old cover off. I tried charcoal at first, but I knew it would rub off, so I brushed that off with a bit of kleenex (making the book look more dirty in the process, bonus!) and ended up using a sharpie to draw on the symbols.
I really liked how the charcoal stuck to the fabric cover of the book, and wanted the edges to look more..animated then they did (at the very least, stand out more) so ended up going around them with the charcoal and then rubbing it off with the same piece of kleenex. I think it added a nice depth to the look of the book.
I used this kind of charcoal (aka burnt sticks) which I had left over from Art school.
I also flipped the front over and did the same around the edges of the gold corner clips, around the edges of the rips and along the spine.
 |
| The charcoal before I rubbed it off. |
 |
| After the heavy lines were rubbed off. |
After I did that, I rubbed charcoal onto the cover, along the spine and on the back more to make it look more dirty. I got it to a point where it looked good and was ready to attach the hand logo to the book.
So I took the original printed version of the had I had, and after finding the placement I thought looked best, traced around it so I would know where to put my painted hand once I had glue on it. I did this because I didn't want to get glue everywhere while trying to find proper placement.
So here is the book so far! I think I may add some more charcoal to the front, it looks too clean in comparison to the back, and once the hand has been glued to the cover, I am going to make some "mud" and splatter the entire book a bit. However, it is currently stuck under 2 dictionaries to make sure it dries flat, so that will have to wait till later!