Showing posts with label Bronwen Robbins. Show all posts

Wednesday, 19 August 2015

Sunday, 29 March 2015

~In time-your heart will open minds, a story will be told" - RWBY progress : More corset.

The corset is together! (mostly)


Back: Black Singapore Chintz. 


Front:  Black jacquard with a rose pattern and hand dyed silk.


All the back pieces are covered in Laminating (row upon row of stitching) to stiffen it up.

And these are the spiral bones and their tips. I have yet to cut the steel flat bones because I lack the proper tools and strength right now!

Tomorrow:  Steel bones, the bottom bias strip sewed on, the last parts sewn on and grommets.  Plus I hope to get the cape done too!

Sunday, 20 April 2014

Previously on Kain's costume progress...

Previously on Kain's costume progress: I made a belt and the patterns for some shoes out of paper and fitted them. Then once that was done I cut them out of the craft foam and Worbla.  Well those shoes are done!  Here you go:

I started by shaping the ankle or back part first, and then worked my way down the shoe to the toe.  This way I made sure each piece fit over the previous one.  I had my shoe on my foot, and shaped over both the shoe and foot.  For the ankle and first spike, I had on my leg armor and moved my ankle from side to side and then front to back to make sure it would glide smoothly when I walked and would fit over/around my leg armor.

 At this point all the pieces are separate. I managed to get them to not stick as I shaped by putting  parchment paper between each layer.  In the picture below they are all cool again and are hanging on by fit alone.


Side view!  Just like in the picture but kinda boring right now aren't they? They needs something more I think...


How about Wonderflex piping?  That would make them look more interesting!  Kains shoes don't have this, but I feel it looks more finished now.  I just cut strips of wonderflex that were 1/2cm wide and added them on.  Then I noticed that he had a crest on the toe of his shoe, so I made one out of wonderflex.  After that, the heel looked boring, so I added a crest to that too.


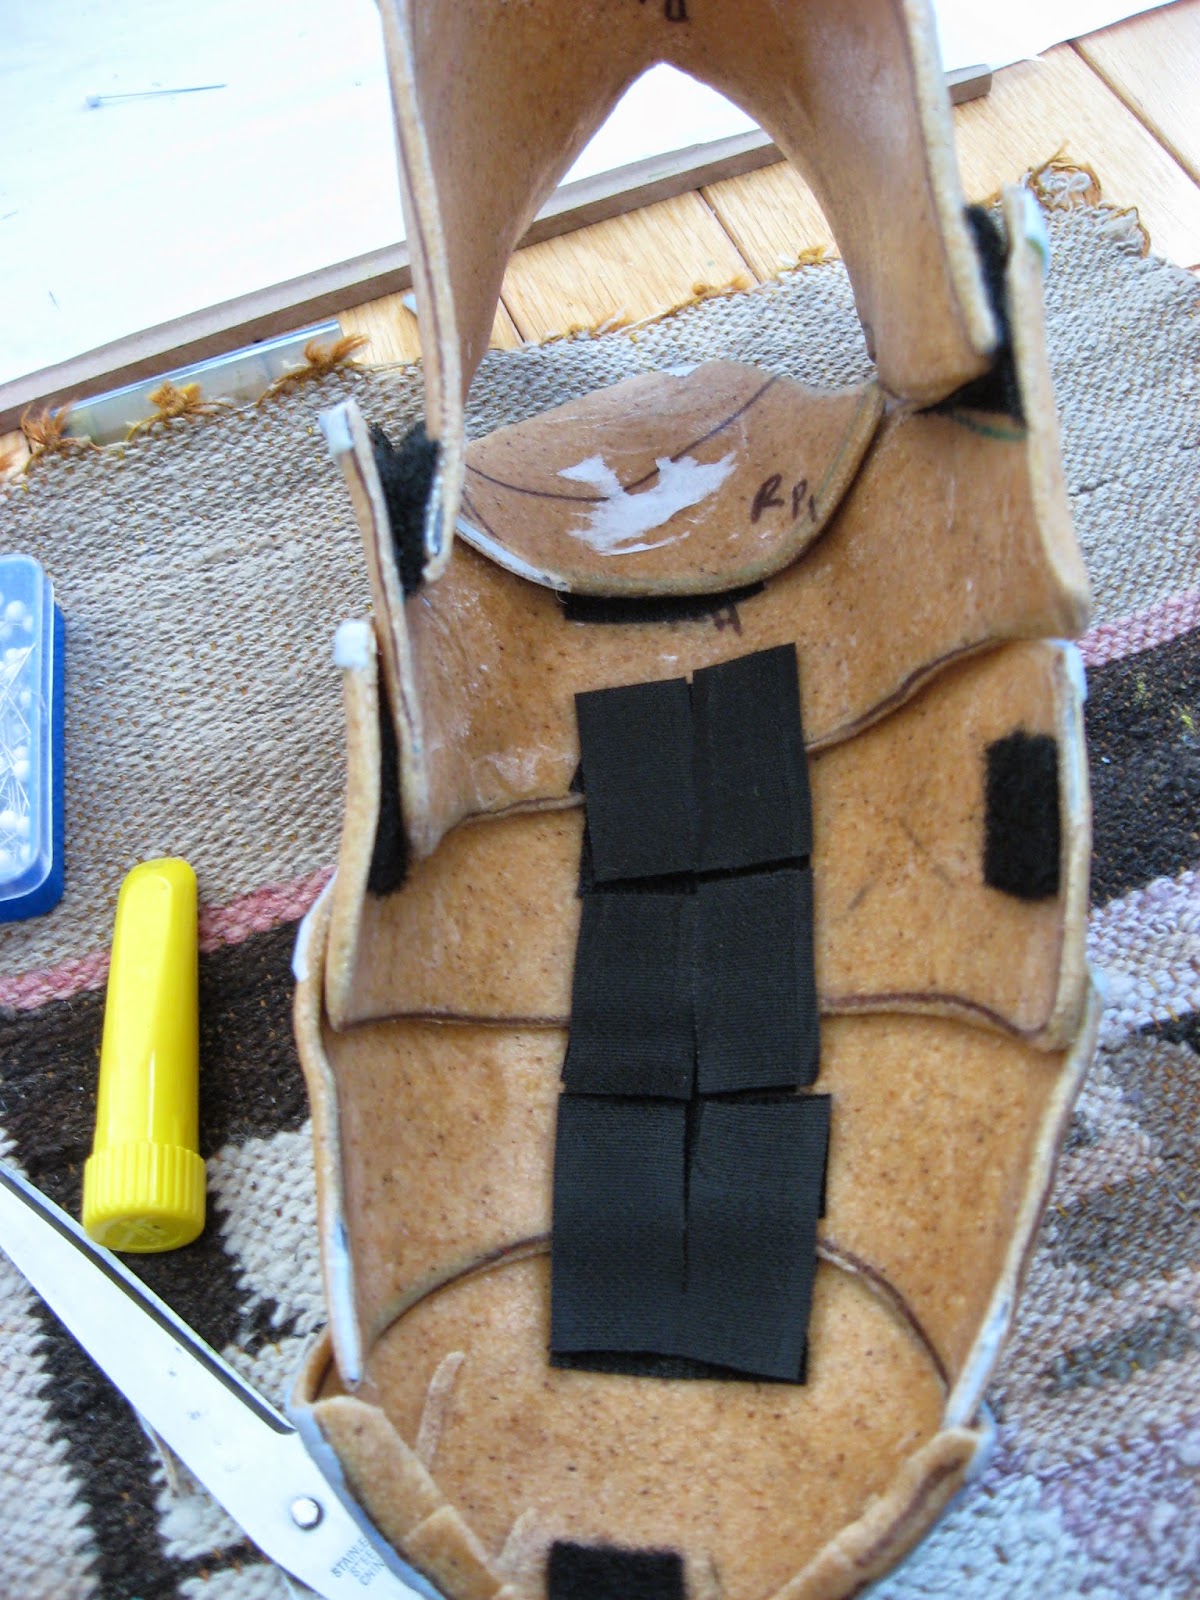
The next step was attaching them all together.  I did this with Velcro.  The heal is separate and attaches on to the very first plate on the front so I can get my shoe on and off.  The next thing I did was add Velcro to each plate and then strips of Velcro attached each plate to the next.  I wanted my foot to remain flexible when I walked/posed.  Originally, I used a bunch of little strips, but the middle piece always felt really loose when I tried walking in them, so I replaced all those individual strips with 2 longs strips and the entire shoe is much more stable feeling now.

I got the idea from a friends Dragon age spine that he did for his costume, so it would bend and sway when he walked.  It works really well!

I did however find that the toe of my shoe always felt loose and like I could loose it when walking around an not realize it, so I heated it up and actually fused it to the second plate there so they are one solid piece.  The movement is still really good.

 The last thing I did was make a cross from Velcro to hold the toe/front part of the shoe to my shoe better.  It attaches at the toe and on the middle plate. (You can see the pieces on the above picture).

Once the shoes were done, I started to work on my knees.  I made a basic crest shape for the back, and then worked the point on Kain's Knee armor out with paper and tape. I ended up with 6 pieces for the point, 4 triangle like ones for the front and 2 long curved pieces to raise them up and out from the back shape.


The end looks like this, however it was not pointy enough in the middle for my tastes so I built it up with paper clay and then covered it in Wonderfelx.  But for some reason I have no pictures of that. O_o  The armor attaches with a worbla band around the back of my knee, and taking a page from Rashad on Face Off, it will attach with a rivet or washer so it can bend and move as I walk.


When I shaped it to my knee, I wore my thigh and shin armor to make sure it would fit over both nicely.  I also shaped the flat back crest part first and then attached the raised point you see above after it was shaped.  The first time I did this, I made the mistake of trying with the entire knee, point and all together and could not heat it all up properly to get it to shape, so I scrapped it and started over. Lesson learned. On to the next!

BONUS PHOTO!!!  


Some of Sean (our Cecil) pieces that have been covered in many layers of Gesso.  You can see my arm and shin armor in the background.  Billy our painter has been hard at work!

Friday, 28 March 2014

That was easy..

I made the belt for my Kain cosplay the other day, compared to the shoe, which I did after it was a walk in the park!

We wrapped my mid-section with saran wrap and tape and marked the center and where my sides were, and then cut it off.  I then took it and made a nice paper pattern for each piece, because I found I really did not like the straight from tape patterns. I think my fashion designer background requires I have nice copies of my patterns so I can tweek them till they are right.

  I mad the pattern into three parts. The winged part, the circle and then the design on the circle.  The wings and circle I did out of worbla, and the detail work I did in wonderflex.


Tracing my wings onto the worbla.

The belt "kit" as I have been calling the pikes of parts.  You can just see on the white craft foam in the picture below that I glued some thin lines of craft foam onto the lower wing. I wanted there to be a raised detail to make the belt have more interest then being a purely flat thing.

After everything was cut out it was time for heat.  Now in the pictures I have of Kain the circle is a rounded buckle that curves out, which is hard to do uniformly by hand....


Sooooo, enter the kitchen strainer!  I had though of using a mixing bow, but their edges are not completely round, I was stumped for a bit, but then remembered the kitchen strainer would be completely round!


Now here I have it just on top of the strainer, but when I actually heated it, I put a layer of  freezer paper between it and the strainer to make sure it would not stick. I use this strainer on a regular basis after all.


The finished product!  This is the back, which you wont see. The paper caused a couple little lines to appear, but that is okay.

Fast forward to sticking everything together:  The near final piece, just needing some raised details on the gray part and more shaping.
I have actually finished this, but I appear to have not uploaded the photos yet! I will do that tomorrow!

Tuesday, 18 March 2014

The return of the monster face! Or time to finally do those chest details!

 The return of the monster face!  Or time to finally do those chest details!

You may recall the pattern I made for the crest shape on Kain's armor.  Well now that I am back in business with wonderflex, I can finally do something with it! Woo
 
 First thing is first, I made a paper pattern of the basic shape of the crest, minus the bottom band and the little points.
 
I then transferred that pattern to the Wonderflex and attached it to my armor!  Be sure to heat up both the wonderflex and the worbla where you will be adding the wonderflex, or it comes apart when dry, I found that out with the front detail on my shin armor.  Thankfully, re-attaching it is as easy as heating it up again.


Now I got busy working and forgot to take a couple pictures here and there...

So you can see that not only did I attach the front crest, I also (shortened) and then covered the raised spikes for the front of the armor and attached them.  Kain's armor also has 2 rivet like things next to these spikes, so while the worbla was still hot, I grabbed some tiny halo-snap tops from my sewing box and poked them in. Now I knew from a tutorial that they wouldn't stay in once the worbla cooled down, so I put glue on the backs of them and then stuck them back into the conveniently marked holes from the prongs on the back


The next part was to cut out the bottom band on the crest and the little toothy things.  The toothy things are raised in the picture I have of Kain's armor, so it was time for some fiddly work.  I cut out the shape of the toothy-things in three different sizes and made some tiny pyramids.  Then, holding them down with the blade of my exacto knife (the wind from the heat gun just blows tiny pieces around if you don't hold them down) I heated them out and smoothed down the edges till they were gone, leaving a raised triangle. I then took a pencil and using it as a tiny rolling pin, rolled towards the center of the pyramid making it go to a point.

Next I attached the bottom band and then reheated my tiny pyramids and attached them as well. They got a wee bit misshapen, but I just straightened the edges with the blade of my exacto knife while the plastic was still hot.
 Last but not least, I rolled out another worbla worm and did the decorative piping around the outer edge of the crest.

Now that the lower chest was done, I took my little horn shape for the chest armor and covered it in Wonderflex and attached it to the armor.


 Now, all that is left is the collar on this piece and a belt on the side seam. Woo!

Bonus!

I got a bunch of work done on the back of my shin armor too!


I covered the spikes for the back of my shin armor and attached them, then it was time to start making the 3 other spikes that go onto the back of this piece.  One on the inner side, just looks more like a bent out piece of flat metal rather then an actual spike, so I made a pattern for it and cut it out of the worbla.


Sorry blurry picture. I decided having this random piece just hanging out there looked silly, so I put to more halo-snap tops on it to make it look like it was riveted to the armor.
   I also decided I didn;t like the look of the single layer of wonderflex, thinking it looked to thin, so I traced the tip of my pattern peice and cut it out and then attached it to the back of the little spike to make it look a little better.  I liked it enough that I decided to do the same to the big spike that comes up the heel of the armor.

 Cut out the top, heat up, stick to other wonderflex piece and trim off any excess you might have.

So far so good.
 I also started to carve the more 3D styled spikes that go on the outer edge, but I only had enough glued pieces of pink foam to do 2 and I needed 4, so once again, I must wait for glue to dry. Here are the 2 I did manage to carve though.


Enough for today!


~I just dyed in your arms tonight~


Actually, I dyed in your arms last night, but that wouldn't have gotten the song stuck in your head as well now would it?  Anyway, I started a bit of work on the Edge costume, (I needed a break from the armor) which has now switched to Edge from FF4 the after years.


I managed to find some yellow fabric at work that actually had Amano style poke a dots on it in the right size but it was lemon yellow and I needed a more gold yellow for this costume.  


Not to look this gift horse in the mouth, I mean it was the perfect fabric, just too yellow, I grabbed a meter and a half of the fabric and then some Old Gold Dylon dye.  Then I dug out my dye pot and got going!

Double, double, toil and trouble, fire burn and cauldron bubble.  

There really isn't much to talk about here.  Dylon is a store brand dye that can be found at most craft or fabric stores.  The instructions are in a little pamphlet that is attached to the back of the packet. It is easy to use and takes about 20 minutes.  All you need at home to do it is some salt, a pot designated for dying and that will not be used for food.  I got my dye at work, the salt from the cupboard and a pot from Walmart.

By the prickling of my thumbs, something wicked this way comes.

It ended up being a nice sort of Orange gold, which is more orange then the picture up top, but I think it will look really nice with the rust coloured linen we got for the cape.

I also took time yesterday to finish the pattern for the butt cape on Kain.  I traced it over on to velum paper and then, since I was out of India ink, I coloured it in with a black sharpie, and then a black permanent marker.  The plan is to silk screen this design, and to do that you need a completely opaque pattern for transferring onto a slik screen in the dark room, any light that gets through will ruin the transfer of the design in the dark room.
This may or may not need to be scanned in and re-printed onto the velum via a printer. It may still be too translucent.

Today, since I once again have wonderflex, I will be doing the final details on some of my armor pieces!  Stay around for pictures later!