The outer later of corset (seen below) is pinned to the ticking layer, and piping was sewn to the top as well. The piping us used in the final fitting, you can pull on the cord and get a better fit along the top.
The corset, now sewn together, ready to have its seam allowances trimmed and to be flipped right-side-out.
I had said the ticking made it stiffer, this is the corset standing up on it's own with no boning yet, just the stiffness of the ticking holding it up.
A spiral bone in the process of being slid into its bone casing, now is when the corset goes from sorta heavy to heavy. :)
This is what the spiral bones look like in the casing, the white ones are hidden by a flap of fabric (where the grommets go) but don't really show through.
The last out of the three strips of paper that held my bones until they were ready to go into the corset.
The boning is now all in, I did have to cut 2 shorter, but other then that everything went in great. It's now on a Judy, because I have to drape the kimono style banding on the front to get it to look more like the picture.
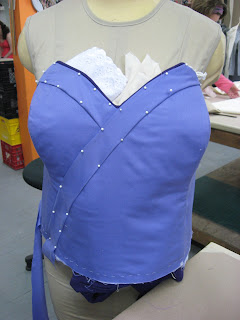
First the shorter band goes on, the rough edges to be hidden by the longer one. Both bands are made with bias strips. Bias is the term for fabric cut at a 45 degree angle and has a great deal more stretch.
And now the longer band is pinned on. Now comes a great deal of hand sewing.
The bands finally sewn on, but in need of a good pressing, another bias strip has been pinned along the bottom to bind the lower edge. The binding will be hidden by the pink sash later.
I machine sewed down the front for a sharper edge and then hand stitched down the binding on back.
All done!


*ahem*
ReplyDeleteEEEEEEEEEEEEEEEEEEEEEEEEEEEEEEEEEE
so excited