Wednesday, 29 February 2012

How about that skort.

Well with the corset near done, I worked on the skort/culotte/shorts thing.

I did some patter mods since the model saw it. She wanted it to be more flared then it was, had thought about putting in triangular gores, but decided not to. Instead, I cut it into 2 parts a yoke band and then spread and widened the bottom to have more of a flare to it.  And I also added pockets and a ribbon tie to attach her sword prop to when she wasn't using it, so her hands could be free.
So here is the pocket ready to sew into the side seam.


 And here it is sewn in from the inside out.


Huzzah a pocket!


More to come...

A corset :Inside and out

The outer later of corset (seen below) is pinned to the ticking layer, and  piping was sewn to the top as well.  The piping us used in the final fitting, you can pull on the cord and get a  better fit along the top.


The corset, now sewn together, ready to have its seam allowances trimmed  and to be flipped right-side-out.

 I had said the ticking made it stiffer, this is the corset standing up on it's own with no boning yet, just the stiffness of the ticking holding it up.
A spiral bone in the process of being slid into its bone casing,  now is when the corset goes from sorta heavy to heavy. :)

This is what the spiral bones look like in the casing, the white ones are hidden by a flap of fabric (where the grommets go)  but don't really show through.

The last  out of the three strips of paper that held my bones until they were ready to go into the corset.


The boning is now all in, I did have to cut 2 shorter, but other then that everything went in great.  It's now on a Judy, because I have to drape the kimono style banding on the front to get it to look more like the picture.

First the shorter band goes on, the rough edges to be hidden by the longer one.  Both bands are made with  bias strips.  Bias is the term for fabric cut at a 45 degree angle and has a great deal more stretch.

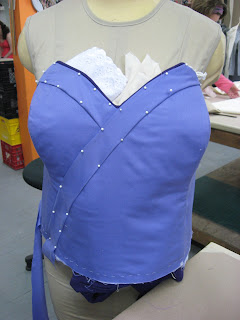
And now the longer band is pinned on. Now comes a great deal of hand sewing.

The bands finally sewn on, but in need of a good pressing, another bias strip has been pinned along the bottom to bind the lower edge. The binding will be hidden by the pink sash later.

I machine sewed down the front for a sharper edge and then hand stitched down the binding on back.


All done!


Sunday, 26 February 2012

How many pieces of fabric does it take to make a corset?

I kinda fell behind there!

Well I shall start at the very beginning, a very good place to start.

Already cut out here are the skort (or culotte or shorts that look like a skirt) for the Snow Princess costume and the various parts of the corset.

I've set the skort aside  and concentrated on the corset.

So just how much fabric is in a corset?  About 4 layers.  The cream coloured fabric is Ticking, a stiff, heavy cotton and there are two layers of it, the fairy fabric is a Flannel and the lavender is the outer fabric.

The next step is to baste the layers together,  first baste the 2 layers of ticking together, and then baste the flannel to the outer fabric.  Flannel grabs most fabrics and keeps them from slipping and sliding.

Now that everything is basted, it's time to pin the outer  pieces together and sew it, but not the ticking.

Almost a corset...

Why didn't I sew the ticking together?  Well, before I can sew it together I must Laminate it and mark where my bones will go.  Below the larger piece (my center front) with the bust line is laminated, and the other one next to it is not (but does have its bone casings sewn).


Laminating is a process where you stitch row upon row of stitches.  It stiffens the fabric and makes it stronger, after its been laminated the ticking layer of the corset can pretty much stand up on its own.

A better shot of the Laminating and a bone casing:
The next step is to sew together the laminated pieces and measure and cut my bones.  I use steel bones.  The plastic ones are cheep and tend to over time, conform to your body shape and then start to bow out at weird angles.  Steel bones do not do that.  There are two types.  White flat bones, which are usually only used in straight areas (like where the grommets go up the back), because the only bend 2 ways, front and back.  Any curved seams, or seams that may be straight, but would be on a curvy part on the body (like side seams) I use Spiral bones, which bend every way :)


Unless you have a bone cutting machine, or access to one, here are the tools you'll need to cut your bones.  That and some good upper arm strength.  The flat steel bones are really hard to cut through by hand, the spirals not so much.  I had access to a cutter to cut my bones thankfully.


Here are all my bones!  Each are marked  as to which seem the go to, so now its just a matter of finishing the corset!  But that is a post for another day.

Tuesday, 21 February 2012

What becomes of Snow?

Well all that is left for the Jem dress is one final fitting and it's done, all that is left on the dark farie is to double check my hem, hem it and make the hat and staff.  All that is left on Rapunzel is to tighten the upper sleeve (and if I can find some lace aplique I can live with, attach the flower motif along the front and hem.

So I guess the only thing left to do is start another piece!

My Model Laina Martin who you may remember from this post wanted to be Snow Princess Hayate from The Shining Hearts game (a Japanese RPG I believe).  So that is what I am starting this week!


Concept art from the game:


My sketch:

 Here we go!  This one involves another full corset, so I can only hope it will go faster then the Rapunzel one.


Saturday, 18 February 2012

(Congratulations,) you're on your way out, from here on in I'll be taking the lead, (Congratulations,) you're on your way out

I'm bound to win; I was born to succeed

Congratulations to me, (congratulations to me
Congratulations!
-The misfits.

This can only mean I am nearing the end of this costume! Which in fact I am.  The asymmetrical purple binding on the collar and hem is attached, and the lining is hemmed and bound as well.
The front
The back

All that is left is to make the belt and legwarmer!  So here we have my green fabric laid out and my belt pattern on top of it.  That will be double the width of that pattern and double the length (there will be a seam up the middle of the belt)

Here is my leg warmer pattern, and the elastic that will hold it onto the leg if all goes well.  I've since sewn it up with a zigzag stitch (straight stitches do not move and will just pop, but the zigzag has a little more give). I hope to fit this on her soon, hem it and be done!

And here is the final piece, now on the proper sized judy so as not to stretch it out.  I will probably be adding some loops to hold the belt in place better as she walks, but other then that, it's complete.
The front
The back

Wednesday, 15 February 2012

I'm a designing woman (I've got what it takes), I'm a designing woman (I make my own breaks), I'm a designing woman (designing woman)

And I've got designs on you!
-The Misfits

Well I have designs on a Judy, at least.  Here is Pizzaz's dress,  as it was last Thursday. I'd started cutting into the hem.

Here is the back, I had left it uncut at the time, because I wanted to be sure it would be long enough for my model to wear. I don't want any "wardrobe malfunctions" and neither does she.

And here is the collar.  Which started out as a rectangle with the neck hole designed into it, and later became a crazy pelt looking thing.
What a mess it makes!  The fabric is fuzzy, so there was suddenly way more dust in the studio. :)


Fast forward to Monday when my model came in for a fitting! And Point of Light productions came in to take photos.

Working with stretch fabric has its share of issues, in this case, leaving it zipped up on a judy  that was probably too big for it over the weekend, may have stretched out the fabric, that or the fabric just stretched when I sewed it. Either way, I had to take in the sides, which meant removing and redoing my invisible zipper.


It also gave me the chance to make sure the skirt was long enough in back and therefore finish cutting out the hem line.  

It also gave me the chance to measure her leg for that one green sock Pizzazz wears (oh the 80's I love you so, but you had some..special fashion ideas). To make the leg warmer, simply take measurements going down the leg (I did 10 cm apart). Then later, on paper, draw a line, then divide the measurements by 2 putting 1/2 on each side of the line. When that is done, fold your paper in half along the line, join the edges of each measurement together and cut out.


That's that for now!  Today, I got a little busy with work and didn't break to take pictures, but I can say that the legwarmer is cut out, the hem is finished, and bound, the collar is attached and the lining awaits attaching!
Woo!

Monday, 13 February 2012

I updated my blog stats, now anyone should be able to comment and the time zone is correct.

Hooray!

Website

I've started work on an actual website!  Here's hoping it works out well, I've never done it before.  I'll be launching it officially by April 2012 if all goes according to plan, which it has too.

Sunday, 12 February 2012

The secret is out!

So I will share a secret with you. It's probably not really a secret, but it's fun to say it is.  My mother taught me this sewing secret.  I'm sure if you have ever sewn you know the mind breaking horror and frustration that can come with putting in a zipper, especially an invisible zipper.  If you don't, consider yourself lucky and believe me when I say they are evil.

Invisible zippers are tricky at best, even now with as many as I have put in to date, I still will almost always put one side in backwards the fist time around.  There is that and if they are just pinned, they can slip and move and be a pain. So my mother taught me to pin first and then go in and baste that sucker down. I works remarkably well!  Some of the girls at school didn't even realize there was a zipper in my side seam until they saw the pull dangling at the top.


My own trick after basting is to use a regular zipper foot  to sew it in and not an invisible zipper foot. I tried in class when they taught us to use a invisible zipper foot, and it had disastrous consequences. I find if you move your needle position over almost as far as it can go (but not all the way over) there will be a millimeter or two between it and the edge of the zipper foot, and that extra distance between foot and needle will bend over the edge of the invisible zipper and get a closer stitch.

Saturday, 11 February 2012

She Makes an Impression, where ever she goes, she makes an impression from the head to her toes...

Okay, yes that is actually one of the Holograms songs not one of the Misfits, but I don't mind. With that here are some pictures of the progress on "acidic rocker".

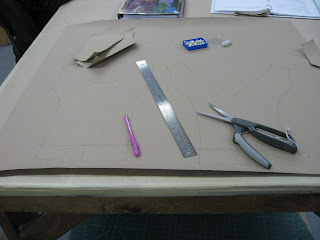
I thought I would babble about the process of paper to garment.  So, to start you make a paper pattern.  Here is mine,  for a "princess seam" top there are four pieces, a center front, center back, side front and side back (It helps with the shaping and makes a top that follows the contours of a woman's body). The two little pieces up in the left corner are the side front and back and the ones drawn on the paper not yet cut out are the center front and back.

Next you would cut them all out, make sure the armhole seams and hem lines match up (called truing up seams) and then lay out your fabric. You can see below to make the top, you need one of the front and back and four of the side pieces.

I've done the same here for the skirt. They are upside down looking, because the fabric has a nap (it's furry, one way is rough when you drag your hand along, the other soft and smooth, that is called a nap).

I did the same with the base of the collar.  Both the collar and skirt will be cut into to give it a jagged finish like the picture two posts back.
The next step was to cut them out, I let them hang over night, which I really didn't have to do, but it kept them out of the way.

The next day, I surged the edges, usually I would match the surger thread colour to the fabric, but I knew these would be hidden by the lining in the end, so I wasn't too worried about matching. After that it was a matter of pinning the top and skirts together and sewing them.

Here they are all sewn together and the seams pressed flat. The skirt is extra long so I can later cut points into it. It will be much shorter in the end.
I'll post pictures of the dress and collar as I cut into them and put in the zipper tomorrow. Hopefully, weather permitting, I'll have some pictures of the dress so far on the model by Monday!  I was supposed to fit her tonight, but Canada in the winter decided to throw a snow storm at us instead!

Friday, 10 February 2012

13th fairy fitting!

Last night I had the model/owner to be of the 13th fairy into the studio for a fitting.  I wanted to see how it all fit and mark for the hem.  She has to wear this in a fashion show (which will involve a short set of stairs) and then for a weekend at the Anime North convention in May, so I wanted it to be long, but not so long she will step on her hem and trip/tear the dress. At the very least I wanted it to be near floor length and hid her feet so she could wear comfortable shoes (or even sneakers if need be) and keep them hidden.

She got the garment on with a little help, the last time she wore it, there was no zipper up the front so she could just slide it on like a coat, but now there is a zipper and the front is sewn up so it's more like a really long and heavy dress.

While she was wearing it, I noticed a weird problem with the shoulder.  It was ridging up on  the back of one side very obviously, and slightly on the other.
 After fiddling with it I realized that it was the seam binding I had put in there to hold the sleeve to the facing (a second layer of fabric to hid bra lines and such).  I had sewn the sleeves seam allowance to the facing and I really should have bound each separately.  So I'll be unpicking that and doing each in hopes that it will remove the bump.

The next challenge was finding this thing:
It's usually in our room, but was in the first year room, which was locked and the key in a box with a combination lock, who's combination none of us could remember. >_<  I wont say how myself and another student got in, ingenuity I guess, the hard part was getting the key back in the box. :)
The hemmer thingy, sadly I do not know its official name, I only know its the greatest thing ever and when I found one for myself at a second hand store department store for $5 I squealed loud enough that probably the whole store heard me.

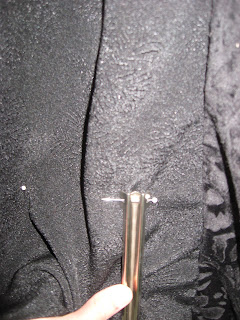
What does it do you ask? well it's a ruler on a stand, with a little metal hinged piece that almost looks like a gator mouth.
The end is rippled so that when you stick a pin through it, its wiggled though the fabric and will stay until you take it out.
I had her stand on a little stepping stool to make sure the length was right. The ruler and the sliding metal piece allow you to move your hem line up or down to pin.  In the end, it means you will have an even hem all the way around your dress.  I did pin this from one edge of the train to the other as always floor length, but I may angle it down so the dress trails more in back.

And now a shot of my model Liz Eaton in the dress from behind,

And from the front!
Enjoy!